5 Minutes to the Perfect Golf Backswing
5 Minutes to the Perfect Golf Backswing
To Get Instant Access, Get Your Free Membership!

Description
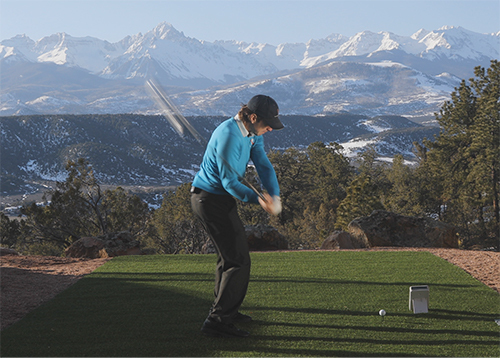
Once you've mastered the takeaway using our "5 Minutes to the Perfect Takeaway" video, you're ready to begin the process of building the perfect top of the backswing position that even Tiger Woods would envy. Completing the backswing, in many ways, is simply continuing the movements that we did during the takeaway. In this instructional video, we'll introduce right elbow flexion, the position of the right elbow at the top and the internal rotation of the left arm (all for right handed golfers - if you're a lefty, simply switch right for left).
Video Practice Points
- You must completely master the setup and takeaway before moving on to the backswing lesson
- Extend your arms and raise them from belt-high to the bottom of your chest
- At the top of the elevation, fold your right arm about 90°
- Grab your left thumb in your right hand and repeat elevation & flexion
- Once elevation & flexion are mastered, add in posture & rotation
- Keep the elbow pit facing away and up, never toward you
- When movement sequence is grooved add the club back in - hold it upside down at first
- To put it all together, start in setup posture and go through the drills again
- Next, start in setup and move to the top of the swing in a single motion, first with the club upside down, then held normally
Related Articles
The Golf Backswing, Step by Step
Golfer Makes HUGE Swing Change in 4 Minutes with RST
How RST Teaches You the Golf Swing
All Golfers CAN Make a FULL Shoulder Turn!
 WEBVTT
1
00:00:04.120 --> 00:00:06.219
Once you've mastered the setup and the
2
00:00:06.219 --> 00:00:08.199
takeaway, it's time to get us all the way
3
00:00:08.199 --> 00:00:10.039
to the top of the backswing. If you
4
00:00:10.039 --> 00:00:11.539
haven't mastered the setup and takeaway
5
00:00:11.539 --> 00:00:13.800
yet, you're not ready for this video, do
6
00:00:13.800 --> 00:00:15.980
the right thing, master the takeaway
7
00:00:15.980 --> 00:00:18.079
first, and then come back for this video
8
00:00:18.079 --> 00:00:19.559
once you've mastered that piece, because
9
00:00:19.559 --> 00:00:21.879
you need to have a perfect takeaway to
10
00:00:21.879 --> 00:00:23.600
set up a backswing to make it simple to
11
00:00:23.600 --> 00:00:25.160
get to the top in the right positions.
12
00:00:25.800 --> 00:00:27.739
I'm going to walk you through the exact
13
00:00:27.739 --> 00:00:29.559
same progression that I use when I teach
14
00:00:29.559 --> 00:00:31.559
students in person, so that you can get
15
00:00:31.559 --> 00:00:33.460
the exact same experience and understand
16
00:00:33.460 --> 00:00:36.240
exactly how. You need to work through the
17
00:00:36.240 --> 00:00:38.479
backswing to get into a perfect position
18
00:00:38.479 --> 00:00:40.000
at the top every time without any
19
00:00:40.000 --> 00:00:40.460
problems.
20
00:00:41.000 --> 00:00:43.200
There's two techniques that I use. The
21
00:00:43.200 --> 00:00:44.960
first one is progression or stacking.
22
00:00:45.380 --> 00:00:46.920
What that means is I'm going to make
23
00:00:46.920 --> 00:00:49.659
things really simple at first, and then
24
00:00:49.659 --> 00:00:52.020
each time we master a simple little piece
25
00:00:52.020 --> 00:00:53.820
of the backswing, I'm going to stack
26
00:00:53.820 --> 00:00:55.020
another piece on there to make it more
27
00:00:55.020 --> 00:00:55.520
challenging.
28
00:00:56.420 --> 00:00:57.939
The second piece is I'm going to use
29
00:00:57.939 --> 00:01:00.399
isolationism, and what that means is I'm
30
00:01:00.399 --> 00:01:01.939
going to take all the distractions away
31
00:01:01.939 --> 00:01:03.679
at first. There's going to be no club, no
32
00:01:03.679 --> 00:01:05.920
ball, none of that, so we're really just
33
00:01:05.920 --> 00:01:07.900
focusing on movement because that's
34
00:01:07.900 --> 00:01:08.920
really what we're trying to do. We're not
35
00:01:08.920 --> 00:01:11.159
trying to hit a perfect golf shot or have
36
00:01:11.159 --> 00:01:13.099
a perfect contact or impact position yet.
37
00:01:13.299 --> 00:01:15.099
We're trying to learn a new movement
38
00:01:15.099 --> 00:01:17.459
pattern, and that's critical so that you
39
00:01:17.459 --> 00:01:19.480
take the what position the clubface is in
40
00:01:19.480 --> 00:01:21.359
and realize all you're trying to do is
41
00:01:21.359 --> 00:01:22.859
create a new movement pattern, and that's
42
00:01:22.859 --> 00:01:24.359
it. And so I'm going to show you exactly
43
00:01:24.359 --> 00:01:25.620
how we do that. So the first thing I'm
44
00:01:25.620 --> 00:01:26.640
going to do is get rid of the golf club.
45
00:01:26.840 --> 00:01:28.980
So don't need that yet, that's just a
46
00:01:28.980 --> 00:01:31.400
distraction, okay? So here's the first
47
00:01:31.400 --> 00:01:33.260
thing that we're going to do. Before we
48
00:01:33.260 --> 00:01:34.579
actually start the movement, I want you
49
00:01:34.579 --> 00:01:36.579
to understand a concept, and this is
50
00:01:36.579 --> 00:01:38.959
critical that you understand this because
51
00:01:38.959 --> 00:01:41.159
this will affect your vision or what you
52
00:01:41.159 --> 00:01:43.799
conceive the golf swing to be. And once
53
00:01:43.799 --> 00:01:45.840
you understand what your preconceptions
54
00:01:45.840 --> 00:01:47.560
are and how they may be flawed a little
55
00:01:47.560 --> 00:01:49.879
bit, you'll understand why people end up
56
00:01:49.879 --> 00:01:51.739
in the typical positions that we see
57
00:01:51.739 --> 00:01:54.239
every day on the lesson tee. So the first
58
00:01:54.239 --> 00:01:55.840
thing I want you to think of is that
59
00:01:55.840 --> 00:01:57.299
there are, when you're looking at the
60
00:01:57.299 --> 00:01:59.079
golf swing from down the line, there are
61
00:01:59.079 --> 00:02:00.340
two dimensions basically.
62
00:02:00.980 --> 00:02:03.719
You're going to think of vertical
63
00:02:03.719 --> 00:02:06.200
movement in the golf swing and around
64
00:02:06.200 --> 00:02:10.479
movement, rotation. So when I use, when I
65
00:02:10.479 --> 00:02:11.800
demonstrate this for my students, what
66
00:02:11.800 --> 00:02:14.379
I'll typically do is put a shaft down the
67
00:02:14.379 --> 00:02:17.240
line in the middle of my body here, and
68
00:02:17.240 --> 00:02:20.740
tell them that anything behind this shaft
69
00:02:20.740 --> 00:02:23.860
would be in the depth dimension, and then
70
00:02:23.860 --> 00:02:25.259
anything moving straight up and down
71
00:02:25.259 --> 00:02:27.379
would be in this vertical dimension.
72
00:02:28.060 --> 00:02:29.979
What most people go wrong with the
73
00:02:29.979 --> 00:02:31.840
backswing is that they try and move their
74
00:02:31.840 --> 00:02:35.240
arms and club into this depth dimension.
75
00:02:35.599 --> 00:02:37.500
And so when they do that, that's how you
76
00:02:37.500 --> 00:02:40.120
end up really flat and deep and in a bad
77
00:02:40.120 --> 00:02:42.319
position at the top. What you need to
78
00:02:42.319 --> 00:02:45.759
think of is that you never move your arms
79
00:02:45.759 --> 00:02:47.259
into this depth dimension.
80
00:02:47.919 --> 00:02:51.099
All the arms are doing is moving in this
81
00:02:51.099 --> 00:02:54.000
vertical dimension, and that's it. Now
82
00:02:54.000 --> 00:02:55.400
technically that's not exactly what
83
00:02:55.400 --> 00:02:58.900
happens, but that's what 99.9% of the
84
00:02:58.900 --> 00:03:01.500
students need to focus on and feel in
85
00:03:01.500 --> 00:03:03.639
their golf swings. So what you're going
86
00:03:03.639 --> 00:03:06.060
to do is to get into this depth
87
00:03:06.060 --> 00:03:07.259
dimension, because obviously the club's
88
00:03:07.259 --> 00:03:09.759
going to end up behind us, that is
89
00:03:09.759 --> 00:03:12.879
handled through rotation. So now as I
90
00:03:12.879 --> 00:03:15.520
turn, that moves my arms,
91
00:03:16.119 --> 00:03:18.939
starts to move them into this depth
92
00:03:18.939 --> 00:03:22.159
dimension. It's done by rotation, not by
93
00:03:22.159 --> 00:03:23.520
me taking my arms and swinging them
94
00:03:23.520 --> 00:03:25.240
across my body. That's going to end up
95
00:03:25.240 --> 00:03:27.819
with a flat swing. So what your arms do
96
00:03:27.819 --> 00:03:30.180
is that they feel as if they're only
97
00:03:30.180 --> 00:03:32.560
moving straight up and down in this
98
00:03:32.560 --> 00:03:33.360
vertical dimension.
99
00:03:34.699 --> 00:03:36.659
And as I'm doing this, this is when our
100
00:03:36.659 --> 00:03:39.400
first drills are going to start, it feels
101
00:03:39.400 --> 00:03:40.919
like I'm just moving my hands straight up
102
00:03:40.919 --> 00:03:43.240
and down over my head. That's it. They're
103
00:03:43.240 --> 00:03:45.240
not moving this way, they're moving
104
00:03:45.240 --> 00:03:46.039
straight up and down.
105
00:03:46.560 --> 00:03:48.479
So when I put these two together,
106
00:03:48.819 --> 00:03:52.199
vertical movement and depth movement,
107
00:03:52.300 --> 00:03:55.099
rotation, here's what it looks like. So
108
00:03:55.099 --> 00:03:57.080
I'm going to only do vertical movement
109
00:03:58.140 --> 00:03:59.800
movement while rotating.
110
00:04:00.840 --> 00:04:04.659
And when you put the two together, you
111
00:04:04.659 --> 00:04:06.539
start to create a golf swing and a swing
112
00:04:06.539 --> 00:04:09.719
plane. But all I'm doing is this with
113
00:04:09.719 --> 00:04:10.139
this.
114
00:04:12.080 --> 00:04:15.020
When you start to understand now is that
115
00:04:15.020 --> 00:04:16.839
my hands and arms always feel like
116
00:04:16.839 --> 00:04:18.699
they're out on this side of the shaft,
117
00:04:18.939 --> 00:04:21.500
never into this deeper dimension. They
118
00:04:21.500 --> 00:04:22.800
feel like they're going straight up and
119
00:04:22.800 --> 00:04:25.100
down in front of my body while my body
120
00:04:25.100 --> 00:04:25.480
turns.
121
00:04:26.139 --> 00:04:28.240
So that's the concept of the golf swing,
122
00:04:28.399 --> 00:04:30.240
of the backswing, is that your arms are
123
00:04:30.240 --> 00:04:32.000
always on this side of the shaft. You
124
00:04:32.000 --> 00:04:33.699
never move them into this dimension. They
125
00:04:33.699 --> 00:04:35.360
do get there. You can see that my hands
126
00:04:35.360 --> 00:04:37.500
are now behind the shaft, but they got
127
00:04:37.500 --> 00:04:39.839
moved there by the rotation of my body.
128
00:04:40.160 --> 00:04:42.680
Okay, so that's the first concept that I
129
00:04:42.680 --> 00:04:44.379
want you to understand. Now let's get to
130
00:04:44.379 --> 00:04:46.120
work doing some drills. It's very
131
00:04:46.120 --> 00:04:47.600
important that you follow along with me
132
00:04:47.600 --> 00:04:49.120
and go through the drills with me. It
133
00:04:49.120 --> 00:04:50.240
doesn't do you any good to just sit here
134
00:04:50.240 --> 00:04:51.839
and watch this video. I need you to get
135
00:04:51.839 --> 00:04:54.779
up out of your chair and follow along
136
00:04:54.779 --> 00:04:57.040
with me because this is important. So the
137
00:04:57.040 --> 00:04:57.939
first thing we're going to do, we're
138
00:04:57.939 --> 00:05:00.060
going to isolate down to the simplest
139
00:05:00.060 --> 00:05:01.839
movements that we can create during the
140
00:05:01.839 --> 00:05:04.480
backswing. And that is what we call
141
00:05:04.480 --> 00:05:07.600
shoulder elevation in the backswing. And
142
00:05:07.600 --> 00:05:08.379
it's very little.
143
00:05:09.120 --> 00:05:10.480
This is how much my arms are going to
144
00:05:10.480 --> 00:05:12.779
move. I'm starting them at belt high and
145
00:05:12.779 --> 00:05:14.360
moving them up about to the base of my
146
00:05:14.360 --> 00:05:16.259
chest, where the bottom of my elbows just
147
00:05:16.259 --> 00:05:18.540
below the bottom of my pectoral muscle.
148
00:05:19.120 --> 00:05:22.300
Tiny amount of movement vertical. You'll
149
00:05:22.300 --> 00:05:25.779
notice that my hands are staying straight
150
00:05:25.779 --> 00:05:27.860
in front of my sternum and my buttons on
151
00:05:27.860 --> 00:05:28.220
my shirt.
152
00:05:28.939 --> 00:05:29.839
And that's it.
153
00:05:30.980 --> 00:05:32.560
From this dimension, I'm standing
154
00:05:32.560 --> 00:05:34.699
straight up. Hands are about belt high.
155
00:05:35.319 --> 00:05:37.000
And they're elevating to the bottom of my
156
00:05:37.000 --> 00:05:39.180
chest. This is what happens during the
157
00:05:39.180 --> 00:05:39.660
backswing.
158
00:05:40.500 --> 00:05:42.000
So once you can do this,
159
00:05:42.560 --> 00:05:44.680
we're ready to add the next piece in. Now
160
00:05:44.680 --> 00:05:45.500
a lot of people, if you're going to be
161
00:05:45.500 --> 00:05:46.959
doing this, we're in trouble. So it's
162
00:05:46.959 --> 00:05:49.220
just straight up and down. Vertical
163
00:05:49.220 --> 00:05:50.040
movement only.
164
00:05:50.860 --> 00:05:53.060
Now what I want you to do is move your
165
00:05:53.060 --> 00:05:55.139
hands to the base of your chest and then
166
00:05:55.139 --> 00:05:57.860
fold your right arm. Notice that my elbow
167
00:05:57.860 --> 00:06:00.839
and my shoulder are in alignment. And
168
00:06:00.839 --> 00:06:02.199
right now my wrist is in alignment.
169
00:06:02.920 --> 00:06:04.800
Later on, we're going to add a little bit
170
00:06:04.800 --> 00:06:06.279
of rotation. But for right now,
171
00:06:07.360 --> 00:06:10.800
elevation, flexion, is how you're going
172
00:06:10.800 --> 00:06:13.040
to learn the basic movements of the arms.
173
00:06:13.480 --> 00:06:14.259
This is it.
174
00:06:15.759 --> 00:06:16.959
From down the line,
175
00:06:17.759 --> 00:06:20.860
elevation, flexion. Notice that I didn't
176
00:06:20.860 --> 00:06:23.319
collapse my right arm, because when we
177
00:06:23.319 --> 00:06:24.680
add the left hand in here in a second,
178
00:06:24.759 --> 00:06:26.360
that would cause my left arm to fold. So
179
00:06:26.360 --> 00:06:28.600
I'm just going here, a little bit of
180
00:06:28.600 --> 00:06:30.680
flexion. Not a lot of movement.
181
00:06:34.920 --> 00:06:37.600
I'm going to grab my left thumb and I'm
182
00:06:37.600 --> 00:06:38.579
going to fold my right arm.
183
00:06:40.540 --> 00:06:44.620
This is the vast majority of what's
184
00:06:44.620 --> 00:06:45.800
happening in the backswing.
185
00:06:46.399 --> 00:06:48.399
Notice that as I'm doing this, notice
186
00:06:48.399 --> 00:06:50.720
that my left wrist is flat and
187
00:06:50.720 --> 00:06:53.339
perpendicular to the ground. This would
188
00:06:53.339 --> 00:06:54.740
be parallel. This is perpendicular.
189
00:06:55.319 --> 00:06:58.579
As I fold my right arm, notice that my
190
00:06:58.579 --> 00:07:00.680
left wrist is now on an inclined plane.
191
00:07:00.680 --> 00:07:01.379
It's at an angle.
192
00:07:02.139 --> 00:07:04.319
This is because I'm allowing my left arm
193
00:07:04.319 --> 00:07:08.759
to rotate slightly as I go back. This
194
00:07:08.759 --> 00:07:10.339
will set the club on plane. If I didn't
195
00:07:10.339 --> 00:07:11.560
do this, the club should have to be too
196
00:07:11.560 --> 00:07:11.920
steep.
197
00:07:12.980 --> 00:07:17.379
So elevation, flexion, and now my hand
198
00:07:17.379 --> 00:07:19.959
would be on plane as I let that rotate.
199
00:07:20.339 --> 00:07:21.980
Notice that my right elbow is still in
200
00:07:21.980 --> 00:07:25.720
front of my shoulder and the left elbow
201
00:07:25.720 --> 00:07:26.980
is above the right elbow.
202
00:07:28.339 --> 00:07:30.040
The other critical piece here is to
203
00:07:30.040 --> 00:07:31.699
notice what I call the right elbow pit.
204
00:07:32.220 --> 00:07:35.560
My elbow pits at address and neutral
205
00:07:35.560 --> 00:07:37.360
joint alignment would face straight away
206
00:07:37.360 --> 00:07:37.779
from me.
207
00:07:38.379 --> 00:07:40.660
Not in like this. That's not good
208
00:07:40.660 --> 00:07:42.639
posture. That's not normal. Everybody's
209
00:07:42.639 --> 00:07:44.139
elbows face out this way if we took all
210
00:07:44.139 --> 00:07:44.899
the muscles off you.
211
00:07:45.420 --> 00:07:48.620
So as I elevate, my arms come across to
212
00:07:48.620 --> 00:07:50.639
the center. There's a little bit of
213
00:07:50.639 --> 00:07:52.399
internal rotation, but we want to try and
214
00:07:52.399 --> 00:07:55.040
keep this right elbow pit always facing
215
00:07:55.040 --> 00:07:56.720
out away from us. That's going to be very
216
00:07:56.720 --> 00:07:57.980
critical when we get into the rest of the
217
00:07:57.980 --> 00:07:58.379
backswing.
218
00:07:59.179 --> 00:08:01.480
So elevation, grab the left thumb,
219
00:08:02.220 --> 00:08:04.839
flexion, and we've got a great backswing.
220
00:08:05.560 --> 00:08:06.980
Now as I mentioned, there's going to be a
221
00:08:06.980 --> 00:08:08.839
little bit of rotation here. We're not
222
00:08:08.839 --> 00:08:10.019
going to worry about this so much for
223
00:08:10.019 --> 00:08:13.360
now. Just here, get that elbow and
224
00:08:13.360 --> 00:08:15.040
shoulder in alignment.
225
00:08:15.600 --> 00:08:17.560
From down the line, we've got elevation,
226
00:08:17.879 --> 00:08:18.939
flexion.
227
00:08:19.459 --> 00:08:21.300
Notice that there's not a great deal of
228
00:08:21.300 --> 00:08:22.839
bend in my right arm. I want to feel like
229
00:08:22.839 --> 00:08:24.899
I have a lot of wit and my hands are out
230
00:08:24.899 --> 00:08:26.139
away from me. I'm not trying to rip my
231
00:08:26.139 --> 00:08:28.259
thumb back into my shoulder. It's here,
232
00:08:28.420 --> 00:08:29.399
and that's it.
233
00:08:30.379 --> 00:08:31.980
That's the basic movement of the arms,
234
00:08:32.000 --> 00:08:34.039
okay? So now what we're going to do, once
235
00:08:34.039 --> 00:08:35.440
you can do that correctly, and watch
236
00:08:35.440 --> 00:08:36.720
yourself in a mirror that you look just
237
00:08:36.720 --> 00:08:37.539
like I did there,
238
00:08:38.279 --> 00:08:39.279
now what we're going to do is we're going
239
00:08:39.279 --> 00:08:40.559
to stack another piece on there.
240
00:08:41.100 --> 00:08:42.299
So what we're going to do is we're going
241
00:08:42.299 --> 00:08:46.039
to do rotation with our elevation and
242
00:08:46.039 --> 00:08:46.480
flexion.
243
00:08:48.620 --> 00:08:48.960
Now,
244
00:08:53.139 --> 00:08:54.440
because you should have already mastered
245
00:08:54.440 --> 00:08:55.899
your setup by now, you should know how to
246
00:08:55.899 --> 00:08:57.259
hinge from the hip and get into the right
247
00:08:57.259 --> 00:08:59.220
position. And you should have already
248
00:08:59.220 --> 00:09:01.419
done five minutes to perfect rotation, so
249
00:09:01.419 --> 00:09:03.679
I shouldn't have to tell you how to
250
00:09:03.679 --> 00:09:04.539
rotate at this point.
251
00:09:05.840 --> 00:09:06.799
Rotate to the top,
252
00:09:07.500 --> 00:09:10.240
and now I'm in the right position. Stand
253
00:09:10.240 --> 00:09:10.759
up again,
254
00:09:11.340 --> 00:09:13.519
elevation, flexion,
255
00:09:14.240 --> 00:09:15.340
posture,
256
00:09:16.659 --> 00:09:17.340
rotation.
257
00:09:18.080 --> 00:09:20.320
That's it. This is how you check your
258
00:09:20.320 --> 00:09:21.120
backswing every time.
259
00:09:22.539 --> 00:09:26.080
Stand straight up, elevation, flexion,
260
00:09:26.799 --> 00:09:28.179
get into your posture,
261
00:09:29.080 --> 00:09:29.720
rotation.
262
00:09:40.639 --> 00:09:43.659
Notice that my elbow is still in front of
263
00:09:43.659 --> 00:09:46.240
my shoulder. I didn't do anything with my
264
00:09:46.240 --> 00:09:49.159
arms when I added rotation. I just
265
00:09:49.159 --> 00:09:51.779
transported them as a unit with my torso
266
00:09:51.779 --> 00:09:53.639
rotation. That's how your arms get moved
267
00:09:53.639 --> 00:09:54.879
into that depth dimension that I was
268
00:09:54.879 --> 00:09:55.519
talking about earlier.
269
00:09:56.279 --> 00:10:00.059
If you find that you do this and your arm
270
00:10:00.059 --> 00:10:00.740
looks like this,
271
00:10:01.800 --> 00:10:03.659
you've let this elbow drift away from
272
00:10:03.659 --> 00:10:03.919
you.
273
00:10:04.460 --> 00:10:06.179
And so what you need to imagine is that
274
00:10:06.179 --> 00:10:08.259
I've drilled a bolt into your arm. It
275
00:10:08.259 --> 00:10:10.620
allows it to move up and down, but it
276
00:10:10.620 --> 00:10:12.059
doesn't allow it to move this way. It
277
00:10:12.059 --> 00:10:13.220
doesn't allow it to move away from the
278
00:10:13.220 --> 00:10:14.879
body. It's only moving in that vertical
279
00:10:14.879 --> 00:10:17.240
dimension, not the depth dimension.
280
00:10:18.019 --> 00:10:21.379
If you find that you're here and your
281
00:10:21.379 --> 00:10:23.059
elbow just moves out a little bit, that's
282
00:10:23.059 --> 00:10:25.740
where that little bit of rotation of this
283
00:10:25.740 --> 00:10:27.019
part of your arm comes in.
284
00:10:28.440 --> 00:10:30.340
A lot of you will find that it's really
285
00:10:30.340 --> 00:10:32.559
normal for you to get here and your elbow
286
00:10:32.559 --> 00:10:35.679
pit wants to face back at you. As we get
287
00:10:35.679 --> 00:10:36.940
into the rest of the backswing, what
288
00:10:36.940 --> 00:10:40.139
we'll see is that as I'm going back, I
289
00:10:40.139 --> 00:10:41.720
want that to face away from me.
290
00:10:42.500 --> 00:10:44.159
And at this point, it should feel like
291
00:10:44.159 --> 00:10:45.720
it's facing the sky. It should never feel
292
00:10:45.720 --> 00:10:46.960
like it's rotated in.
293
00:10:47.519 --> 00:10:50.259
If it's facing the sky, my elbow can fold
294
00:10:50.259 --> 00:10:50.519
up.
295
00:10:51.200 --> 00:10:52.860
If it's facing this way, my elbow is
296
00:10:52.860 --> 00:10:54.580
going to fold in and move out away from
297
00:10:54.580 --> 00:10:56.600
me and get that flying right elbow. So
298
00:10:56.600 --> 00:10:58.059
it's important to keep that elbow pit
299
00:10:58.059 --> 00:10:58.820
facing away.
300
00:10:59.440 --> 00:11:00.919
And now we're in a great position at the
301
00:11:00.919 --> 00:11:03.480
top, okay? So that's the first piece. If
302
00:11:03.480 --> 00:11:05.220
you do this correctly, you take the time
303
00:11:05.220 --> 00:11:06.559
to go through these little steps that
304
00:11:06.559 --> 00:11:06.960
I've done,
305
00:11:08.240 --> 00:11:10.019
elevation, flexion, rotation,
306
00:11:10.700 --> 00:11:12.600
you'll know what it looks like and feels
307
00:11:12.600 --> 00:11:14.100
like to be in the perfect position at the
308
00:11:14.100 --> 00:11:16.600
top of the swing every single time. So
309
00:11:16.600 --> 00:11:17.600
now we're going to challenge you a little
310
00:11:17.600 --> 00:11:17.960
bit more.
311
00:11:18.960 --> 00:11:20.960
Now what I want you to do is go ahead and
312
00:11:20.960 --> 00:11:22.120
pick up a golf club, but I want you to
313
00:11:22.120 --> 00:11:24.360
flip it upside down. The reason for that
314
00:11:24.360 --> 00:11:27.059
is there's a tremendous amount of weight
315
00:11:27.059 --> 00:11:28.419
even though it doesn't seem like it. Once
316
00:11:28.419 --> 00:11:30.440
you start moving this around in space,
317
00:11:30.460 --> 00:11:33.059
there's a lot of inertia. As it builds
318
00:11:33.059 --> 00:11:34.360
momentum, it's going to want to act on
319
00:11:34.360 --> 00:11:35.759
your wrist joints and get you to move out
320
00:11:35.759 --> 00:11:36.259
of position.
321
00:11:36.879 --> 00:11:39.759
You're also attuned to what the club head
322
00:11:39.759 --> 00:11:41.279
feels like to you at the top of your
323
00:11:41.279 --> 00:11:43.220
swing, what you're used to. What you're
324
00:11:43.220 --> 00:11:45.259
used to probably isn't right, but you're
325
00:11:45.259 --> 00:11:46.580
going to want to settle back into those
326
00:11:46.580 --> 00:11:48.240
old movement patterns. We want to create
327
00:11:48.240 --> 00:11:50.340
new movement patterns, which means we
328
00:11:50.340 --> 00:11:51.759
need to break some old habits, and we
329
00:11:51.759 --> 00:11:54.080
need to start with baby steps, okay? So
330
00:11:54.080 --> 00:11:55.120
now we're going to make it a little bit
331
00:11:55.120 --> 00:11:55.820
more challenging.
332
00:11:56.720 --> 00:11:57.960
Hands are still in front of the center of
333
00:11:57.960 --> 00:11:58.539
my chest.
334
00:12:01.079 --> 00:12:03.419
Elevation, flexion, and let's see if we
335
00:12:03.419 --> 00:12:05.559
can keep everything else the same. If
336
00:12:05.559 --> 00:12:08.440
it's not, throw the club down and go back
337
00:12:08.440 --> 00:12:10.580
to doing it with just your arms until you
338
00:12:10.580 --> 00:12:12.519
can do that exactly right every time.
339
00:12:13.340 --> 00:12:16.639
Then we go elevation, flexion,
340
00:12:17.659 --> 00:12:18.620
posture,
341
00:12:19.519 --> 00:12:20.379
rotation.
342
00:12:21.080 --> 00:12:22.320
Same thing here.
343
00:12:23.179 --> 00:12:25.379
Elevation, flexion,
344
00:12:25.960 --> 00:12:26.940
posture,
345
00:12:27.820 --> 00:12:30.159
rotation. Perfect position at the top is
346
00:12:30.159 --> 00:12:31.080
all we've got to do to get there.
347
00:12:31.779 --> 00:12:34.240
Once you master that, this is going to
348
00:12:34.240 --> 00:12:35.820
take a while. You need to be patient with
349
00:12:35.820 --> 00:12:37.100
this because you're going to do it
350
00:12:37.100 --> 00:12:38.919
incorrectly. It's taken me lots and lots
351
00:12:38.919 --> 00:12:41.059
of reps to do it. The goal of these five
352
00:12:41.059 --> 00:12:42.580
-minute series is to get you to do these
353
00:12:42.580 --> 00:12:44.139
same movements over and over and over
354
00:12:44.139 --> 00:12:46.700
again at least five minutes a day. If you
355
00:12:46.700 --> 00:12:48.899
can put in 10, 15, 20, or 30, that's
356
00:12:48.899 --> 00:12:51.200
excellent. In five minutes, you should at
357
00:12:51.200 --> 00:12:53.059
least be able to start making progress on
358
00:12:53.059 --> 00:12:53.700
your golf swing.
359
00:12:54.720 --> 00:12:56.460
Once you start getting that comfortable
360
00:12:56.460 --> 00:12:59.139
where you have it with the shaft upside
361
00:12:59.139 --> 00:13:03.000
down, flip it into the normal position.
362
00:13:03.139 --> 00:13:04.120
This is where things get tricky.
363
00:13:04.879 --> 00:13:05.860
So now what we're going to do,
364
00:13:06.559 --> 00:13:08.200
same thing.
365
00:13:11.240 --> 00:13:12.460
I messed up there.
366
00:13:22.359 --> 00:13:24.720
Elevation, flexion, posture,
367
00:13:25.500 --> 00:13:27.820
rotation. Then we should see what it
368
00:13:27.820 --> 00:13:29.139
looks like and feels like to be at the
369
00:13:29.139 --> 00:13:30.860
top of the swing. Now you're going to
370
00:13:30.860 --> 00:13:32.039
notice that club is going to feel a
371
00:13:32.039 --> 00:13:32.620
little bit heavier.
372
00:13:33.220 --> 00:13:34.179
You're going to notice how it wants to
373
00:13:34.179 --> 00:13:35.419
move your hands and wrists out of
374
00:13:35.419 --> 00:13:37.379
position. It's very important that you
375
00:13:37.379 --> 00:13:39.259
take your time and move very, very
376
00:13:39.259 --> 00:13:39.720
slowly.
377
00:13:40.759 --> 00:13:42.639
Once you've done this enough, you're
378
00:13:42.639 --> 00:13:43.840
going to start out with just your arms.
379
00:13:43.960 --> 00:13:45.159
You may need to do that for the first
380
00:13:45.159 --> 00:13:46.799
week until you can get just your arms
381
00:13:46.799 --> 00:13:47.120
correct.
382
00:13:47.700 --> 00:13:49.519
Then add the distraction of a golf club
383
00:13:49.519 --> 00:13:50.399
turned upside down.
384
00:13:50.960 --> 00:13:52.519
Maybe that'll take you another week. For
385
00:13:52.519 --> 00:13:54.059
some of you, it might take five minutes.
386
00:13:54.960 --> 00:13:56.700
Once you can do it correctly, that's all
387
00:13:56.700 --> 00:13:57.200
that matters.
388
00:13:57.860 --> 00:13:59.480
Then you can flip the club back into its
389
00:13:59.480 --> 00:14:01.299
normal position and start working from
390
00:14:01.299 --> 00:14:01.559
there.
391
00:14:02.320 --> 00:14:04.179
Now, once we know what it feels like to
392
00:14:04.179 --> 00:14:06.360
be in the right position, here's what we
393
00:14:06.360 --> 00:14:09.679
want to try and do. We want to stack all
394
00:14:09.679 --> 00:14:12.200
of these things together and move to the
395
00:14:12.200 --> 00:14:14.259
top of the swing in one motion from a
396
00:14:14.259 --> 00:14:16.320
setup position. We're not quite ready
397
00:14:16.320 --> 00:14:18.379
yet, just yet. So what we're going to do
398
00:14:18.379 --> 00:14:20.220
now, we're going to start out in our
399
00:14:20.220 --> 00:14:24.259
posture and do our elevation and flexion
400
00:14:24.259 --> 00:14:25.159
and rotate.
401
00:14:25.940 --> 00:14:29.039
We want to do this enough until we get it
402
00:14:29.039 --> 00:14:32.620
right every time and can do it from our
403
00:14:32.620 --> 00:14:34.840
setup position. So that's the next little
404
00:14:34.840 --> 00:14:37.340
evolution here of our drills. The
405
00:14:37.340 --> 00:14:39.899
progression here is to start from setup.
406
00:14:41.379 --> 00:14:43.360
Now, once we've got the setup feeling, we
407
00:14:43.360 --> 00:14:44.779
know what it feels like to be at the top.
408
00:14:44.899 --> 00:14:46.559
We know what the arm movement feels. It
409
00:14:46.559 --> 00:14:48.039
just feels vertical. It doesn't feel like
410
00:14:48.039 --> 00:14:48.799
it's moving across.
411
00:14:50.040 --> 00:14:51.179
Now what we're going to do is try and
412
00:14:51.179 --> 00:14:51.960
glue it all together.
413
00:14:52.720 --> 00:14:53.279
Set up.
414
00:14:53.840 --> 00:14:54.820
Get in your posture.
415
00:14:55.580 --> 00:14:57.360
And all I want you to try and do, if your
416
00:14:57.360 --> 00:14:58.919
takeaway is already mastered, which it
417
00:14:58.919 --> 00:15:00.399
should be if you're watching this video,
418
00:15:01.700 --> 00:15:04.600
we're going to try and get from here to
419
00:15:04.600 --> 00:15:06.679
the top. And I don't want you to think so
420
00:15:06.679 --> 00:15:08.240
much about how to do it because your
421
00:15:08.240 --> 00:15:09.759
takeaway should be ingrained by now.
422
00:15:10.480 --> 00:15:12.440
What I want you to do is let your
423
00:15:12.440 --> 00:15:13.659
movement patterns happen, let your
424
00:15:13.659 --> 00:15:16.840
takeaway happen, and feel the same things
425
00:15:16.840 --> 00:15:17.419
at the top.
426
00:15:18.419 --> 00:15:19.659
So you know what it feels like. You
427
00:15:19.659 --> 00:15:21.019
should have done enough reps right now.
428
00:15:21.120 --> 00:15:23.299
By the time you move to this final stage
429
00:15:23.299 --> 00:15:25.279
of trying to do it correctly with the
430
00:15:25.279 --> 00:15:26.700
club in your setup position,
431
00:15:28.299 --> 00:15:29.879
flipped normal right side out,
432
00:15:30.480 --> 00:15:32.580
then it's going to be just getting to the
433
00:15:32.580 --> 00:15:33.799
top. And first,
434
00:15:34.340 --> 00:15:35.519
we're going to take another distraction
435
00:15:35.519 --> 00:15:36.379
out. We're going to take the weight of
436
00:15:36.379 --> 00:15:37.940
the club head out of there. I'm going to
437
00:15:37.940 --> 00:15:39.639
start in my setup position with just the
438
00:15:39.639 --> 00:15:41.500
shaft or just the butt into the club
439
00:15:41.500 --> 00:15:43.340
down. And I'm just going to try and get
440
00:15:43.340 --> 00:15:46.120
to that same setup position or top of the
441
00:15:46.120 --> 00:15:49.779
swing position by doing the same move. So
442
00:15:49.779 --> 00:15:53.580
I'm feeling this and this with a club in
443
00:15:53.580 --> 00:15:54.039
my hands.
444
00:15:56.360 --> 00:15:58.480
I'm just trying to get to the top. If you
445
00:15:58.480 --> 00:15:59.840
can't do it with a club in your hands,
446
00:15:59.980 --> 00:16:01.259
throw the club down,
447
00:16:01.820 --> 00:16:04.440
grab your left thumb, and create the same
448
00:16:04.440 --> 00:16:07.019
movement. But now we're doing it from our
449
00:16:07.019 --> 00:16:07.860
setup position.
450
00:16:09.180 --> 00:16:10.799
Until you can do that right, there's no
451
00:16:10.799 --> 00:16:11.639
point in having a club.
452
00:16:12.720 --> 00:16:14.419
Once you get it all together, then take
453
00:16:14.419 --> 00:16:15.840
the club, get in your normal setup,
454
00:16:16.179 --> 00:16:17.019
normal grip,
455
00:16:17.800 --> 00:16:21.080
and just try and move the same position
456
00:16:21.080 --> 00:16:22.080
at the top every time.
457
00:16:22.740 --> 00:16:24.419
Check yourself in a mirror. If you don't
458
00:16:24.419 --> 00:16:26.279
have a mirror or camera, you're going to
459
00:16:26.279 --> 00:16:27.820
have a hard time mastering these moves.
460
00:16:27.820 --> 00:16:29.519
You must be able to see exactly what
461
00:16:29.519 --> 00:16:32.279
you're doing. Once you can do this, you
462
00:16:32.279 --> 00:16:35.100
will have a perfect backswing every
463
00:16:35.100 --> 00:16:35.639
single time.
WEBVTT
1
00:00:04.120 --> 00:00:06.219
Once you've mastered the setup and the
2
00:00:06.219 --> 00:00:08.199
takeaway, it's time to get us all the way
3
00:00:08.199 --> 00:00:10.039
to the top of the backswing. If you
4
00:00:10.039 --> 00:00:11.539
haven't mastered the setup and takeaway
5
00:00:11.539 --> 00:00:13.800
yet, you're not ready for this video, do
6
00:00:13.800 --> 00:00:15.980
the right thing, master the takeaway
7
00:00:15.980 --> 00:00:18.079
first, and then come back for this video
8
00:00:18.079 --> 00:00:19.559
once you've mastered that piece, because
9
00:00:19.559 --> 00:00:21.879
you need to have a perfect takeaway to
10
00:00:21.879 --> 00:00:23.600
set up a backswing to make it simple to
11
00:00:23.600 --> 00:00:25.160
get to the top in the right positions.
12
00:00:25.800 --> 00:00:27.739
I'm going to walk you through the exact
13
00:00:27.739 --> 00:00:29.559
same progression that I use when I teach
14
00:00:29.559 --> 00:00:31.559
students in person, so that you can get
15
00:00:31.559 --> 00:00:33.460
the exact same experience and understand
16
00:00:33.460 --> 00:00:36.240
exactly how. You need to work through the
17
00:00:36.240 --> 00:00:38.479
backswing to get into a perfect position
18
00:00:38.479 --> 00:00:40.000
at the top every time without any
19
00:00:40.000 --> 00:00:40.460
problems.
20
00:00:41.000 --> 00:00:43.200
There's two techniques that I use. The
21
00:00:43.200 --> 00:00:44.960
first one is progression or stacking.
22
00:00:45.380 --> 00:00:46.920
What that means is I'm going to make
23
00:00:46.920 --> 00:00:49.659
things really simple at first, and then
24
00:00:49.659 --> 00:00:52.020
each time we master a simple little piece
25
00:00:52.020 --> 00:00:53.820
of the backswing, I'm going to stack
26
00:00:53.820 --> 00:00:55.020
another piece on there to make it more
27
00:00:55.020 --> 00:00:55.520
challenging.
28
00:00:56.420 --> 00:00:57.939
The second piece is I'm going to use
29
00:00:57.939 --> 00:01:00.399
isolationism, and what that means is I'm
30
00:01:00.399 --> 00:01:01.939
going to take all the distractions away
31
00:01:01.939 --> 00:01:03.679
at first. There's going to be no club, no
32
00:01:03.679 --> 00:01:05.920
ball, none of that, so we're really just
33
00:01:05.920 --> 00:01:07.900
focusing on movement because that's
34
00:01:07.900 --> 00:01:08.920
really what we're trying to do. We're not
35
00:01:08.920 --> 00:01:11.159
trying to hit a perfect golf shot or have
36
00:01:11.159 --> 00:01:13.099
a perfect contact or impact position yet.
37
00:01:13.299 --> 00:01:15.099
We're trying to learn a new movement
38
00:01:15.099 --> 00:01:17.459
pattern, and that's critical so that you
39
00:01:17.459 --> 00:01:19.480
take the what position the clubface is in
40
00:01:19.480 --> 00:01:21.359
and realize all you're trying to do is
41
00:01:21.359 --> 00:01:22.859
create a new movement pattern, and that's
42
00:01:22.859 --> 00:01:24.359
it. And so I'm going to show you exactly
43
00:01:24.359 --> 00:01:25.620
how we do that. So the first thing I'm
44
00:01:25.620 --> 00:01:26.640
going to do is get rid of the golf club.
45
00:01:26.840 --> 00:01:28.980
So don't need that yet, that's just a
46
00:01:28.980 --> 00:01:31.400
distraction, okay? So here's the first
47
00:01:31.400 --> 00:01:33.260
thing that we're going to do. Before we
48
00:01:33.260 --> 00:01:34.579
actually start the movement, I want you
49
00:01:34.579 --> 00:01:36.579
to understand a concept, and this is
50
00:01:36.579 --> 00:01:38.959
critical that you understand this because
51
00:01:38.959 --> 00:01:41.159
this will affect your vision or what you
52
00:01:41.159 --> 00:01:43.799
conceive the golf swing to be. And once
53
00:01:43.799 --> 00:01:45.840
you understand what your preconceptions
54
00:01:45.840 --> 00:01:47.560
are and how they may be flawed a little
55
00:01:47.560 --> 00:01:49.879
bit, you'll understand why people end up
56
00:01:49.879 --> 00:01:51.739
in the typical positions that we see
57
00:01:51.739 --> 00:01:54.239
every day on the lesson tee. So the first
58
00:01:54.239 --> 00:01:55.840
thing I want you to think of is that
59
00:01:55.840 --> 00:01:57.299
there are, when you're looking at the
60
00:01:57.299 --> 00:01:59.079
golf swing from down the line, there are
61
00:01:59.079 --> 00:02:00.340
two dimensions basically.
62
00:02:00.980 --> 00:02:03.719
You're going to think of vertical
63
00:02:03.719 --> 00:02:06.200
movement in the golf swing and around
64
00:02:06.200 --> 00:02:10.479
movement, rotation. So when I use, when I
65
00:02:10.479 --> 00:02:11.800
demonstrate this for my students, what
66
00:02:11.800 --> 00:02:14.379
I'll typically do is put a shaft down the
67
00:02:14.379 --> 00:02:17.240
line in the middle of my body here, and
68
00:02:17.240 --> 00:02:20.740
tell them that anything behind this shaft
69
00:02:20.740 --> 00:02:23.860
would be in the depth dimension, and then
70
00:02:23.860 --> 00:02:25.259
anything moving straight up and down
71
00:02:25.259 --> 00:02:27.379
would be in this vertical dimension.
72
00:02:28.060 --> 00:02:29.979
What most people go wrong with the
73
00:02:29.979 --> 00:02:31.840
backswing is that they try and move their
74
00:02:31.840 --> 00:02:35.240
arms and club into this depth dimension.
75
00:02:35.599 --> 00:02:37.500
And so when they do that, that's how you
76
00:02:37.500 --> 00:02:40.120
end up really flat and deep and in a bad
77
00:02:40.120 --> 00:02:42.319
position at the top. What you need to
78
00:02:42.319 --> 00:02:45.759
think of is that you never move your arms
79
00:02:45.759 --> 00:02:47.259
into this depth dimension.
80
00:02:47.919 --> 00:02:51.099
All the arms are doing is moving in this
81
00:02:51.099 --> 00:02:54.000
vertical dimension, and that's it. Now
82
00:02:54.000 --> 00:02:55.400
technically that's not exactly what
83
00:02:55.400 --> 00:02:58.900
happens, but that's what 99.9% of the
84
00:02:58.900 --> 00:03:01.500
students need to focus on and feel in
85
00:03:01.500 --> 00:03:03.639
their golf swings. So what you're going
86
00:03:03.639 --> 00:03:06.060
to do is to get into this depth
87
00:03:06.060 --> 00:03:07.259
dimension, because obviously the club's
88
00:03:07.259 --> 00:03:09.759
going to end up behind us, that is
89
00:03:09.759 --> 00:03:12.879
handled through rotation. So now as I
90
00:03:12.879 --> 00:03:15.520
turn, that moves my arms,
91
00:03:16.119 --> 00:03:18.939
starts to move them into this depth
92
00:03:18.939 --> 00:03:22.159
dimension. It's done by rotation, not by
93
00:03:22.159 --> 00:03:23.520
me taking my arms and swinging them
94
00:03:23.520 --> 00:03:25.240
across my body. That's going to end up
95
00:03:25.240 --> 00:03:27.819
with a flat swing. So what your arms do
96
00:03:27.819 --> 00:03:30.180
is that they feel as if they're only
97
00:03:30.180 --> 00:03:32.560
moving straight up and down in this
98
00:03:32.560 --> 00:03:33.360
vertical dimension.
99
00:03:34.699 --> 00:03:36.659
And as I'm doing this, this is when our
100
00:03:36.659 --> 00:03:39.400
first drills are going to start, it feels
101
00:03:39.400 --> 00:03:40.919
like I'm just moving my hands straight up
102
00:03:40.919 --> 00:03:43.240
and down over my head. That's it. They're
103
00:03:43.240 --> 00:03:45.240
not moving this way, they're moving
104
00:03:45.240 --> 00:03:46.039
straight up and down.
105
00:03:46.560 --> 00:03:48.479
So when I put these two together,
106
00:03:48.819 --> 00:03:52.199
vertical movement and depth movement,
107
00:03:52.300 --> 00:03:55.099
rotation, here's what it looks like. So
108
00:03:55.099 --> 00:03:57.080
I'm going to only do vertical movement
109
00:03:58.140 --> 00:03:59.800
movement while rotating.
110
00:04:00.840 --> 00:04:04.659
And when you put the two together, you
111
00:04:04.659 --> 00:04:06.539
start to create a golf swing and a swing
112
00:04:06.539 --> 00:04:09.719
plane. But all I'm doing is this with
113
00:04:09.719 --> 00:04:10.139
this.
114
00:04:12.080 --> 00:04:15.020
When you start to understand now is that
115
00:04:15.020 --> 00:04:16.839
my hands and arms always feel like
116
00:04:16.839 --> 00:04:18.699
they're out on this side of the shaft,
117
00:04:18.939 --> 00:04:21.500
never into this deeper dimension. They
118
00:04:21.500 --> 00:04:22.800
feel like they're going straight up and
119
00:04:22.800 --> 00:04:25.100
down in front of my body while my body
120
00:04:25.100 --> 00:04:25.480
turns.
121
00:04:26.139 --> 00:04:28.240
So that's the concept of the golf swing,
122
00:04:28.399 --> 00:04:30.240
of the backswing, is that your arms are
123
00:04:30.240 --> 00:04:32.000
always on this side of the shaft. You
124
00:04:32.000 --> 00:04:33.699
never move them into this dimension. They
125
00:04:33.699 --> 00:04:35.360
do get there. You can see that my hands
126
00:04:35.360 --> 00:04:37.500
are now behind the shaft, but they got
127
00:04:37.500 --> 00:04:39.839
moved there by the rotation of my body.
128
00:04:40.160 --> 00:04:42.680
Okay, so that's the first concept that I
129
00:04:42.680 --> 00:04:44.379
want you to understand. Now let's get to
130
00:04:44.379 --> 00:04:46.120
work doing some drills. It's very
131
00:04:46.120 --> 00:04:47.600
important that you follow along with me
132
00:04:47.600 --> 00:04:49.120
and go through the drills with me. It
133
00:04:49.120 --> 00:04:50.240
doesn't do you any good to just sit here
134
00:04:50.240 --> 00:04:51.839
and watch this video. I need you to get
135
00:04:51.839 --> 00:04:54.779
up out of your chair and follow along
136
00:04:54.779 --> 00:04:57.040
with me because this is important. So the
137
00:04:57.040 --> 00:04:57.939
first thing we're going to do, we're
138
00:04:57.939 --> 00:05:00.060
going to isolate down to the simplest
139
00:05:00.060 --> 00:05:01.839
movements that we can create during the
140
00:05:01.839 --> 00:05:04.480
backswing. And that is what we call
141
00:05:04.480 --> 00:05:07.600
shoulder elevation in the backswing. And
142
00:05:07.600 --> 00:05:08.379
it's very little.
143
00:05:09.120 --> 00:05:10.480
This is how much my arms are going to
144
00:05:10.480 --> 00:05:12.779
move. I'm starting them at belt high and
145
00:05:12.779 --> 00:05:14.360
moving them up about to the base of my
146
00:05:14.360 --> 00:05:16.259
chest, where the bottom of my elbows just
147
00:05:16.259 --> 00:05:18.540
below the bottom of my pectoral muscle.
148
00:05:19.120 --> 00:05:22.300
Tiny amount of movement vertical. You'll
149
00:05:22.300 --> 00:05:25.779
notice that my hands are staying straight
150
00:05:25.779 --> 00:05:27.860
in front of my sternum and my buttons on
151
00:05:27.860 --> 00:05:28.220
my shirt.
152
00:05:28.939 --> 00:05:29.839
And that's it.
153
00:05:30.980 --> 00:05:32.560
From this dimension, I'm standing
154
00:05:32.560 --> 00:05:34.699
straight up. Hands are about belt high.
155
00:05:35.319 --> 00:05:37.000
And they're elevating to the bottom of my
156
00:05:37.000 --> 00:05:39.180
chest. This is what happens during the
157
00:05:39.180 --> 00:05:39.660
backswing.
158
00:05:40.500 --> 00:05:42.000
So once you can do this,
159
00:05:42.560 --> 00:05:44.680
we're ready to add the next piece in. Now
160
00:05:44.680 --> 00:05:45.500
a lot of people, if you're going to be
161
00:05:45.500 --> 00:05:46.959
doing this, we're in trouble. So it's
162
00:05:46.959 --> 00:05:49.220
just straight up and down. Vertical
163
00:05:49.220 --> 00:05:50.040
movement only.
164
00:05:50.860 --> 00:05:53.060
Now what I want you to do is move your
165
00:05:53.060 --> 00:05:55.139
hands to the base of your chest and then
166
00:05:55.139 --> 00:05:57.860
fold your right arm. Notice that my elbow
167
00:05:57.860 --> 00:06:00.839
and my shoulder are in alignment. And
168
00:06:00.839 --> 00:06:02.199
right now my wrist is in alignment.
169
00:06:02.920 --> 00:06:04.800
Later on, we're going to add a little bit
170
00:06:04.800 --> 00:06:06.279
of rotation. But for right now,
171
00:06:07.360 --> 00:06:10.800
elevation, flexion, is how you're going
172
00:06:10.800 --> 00:06:13.040
to learn the basic movements of the arms.
173
00:06:13.480 --> 00:06:14.259
This is it.
174
00:06:15.759 --> 00:06:16.959
From down the line,
175
00:06:17.759 --> 00:06:20.860
elevation, flexion. Notice that I didn't
176
00:06:20.860 --> 00:06:23.319
collapse my right arm, because when we
177
00:06:23.319 --> 00:06:24.680
add the left hand in here in a second,
178
00:06:24.759 --> 00:06:26.360
that would cause my left arm to fold. So
179
00:06:26.360 --> 00:06:28.600
I'm just going here, a little bit of
180
00:06:28.600 --> 00:06:30.680
flexion. Not a lot of movement.
181
00:06:34.920 --> 00:06:37.600
I'm going to grab my left thumb and I'm
182
00:06:37.600 --> 00:06:38.579
going to fold my right arm.
183
00:06:40.540 --> 00:06:44.620
This is the vast majority of what's
184
00:06:44.620 --> 00:06:45.800
happening in the backswing.
185
00:06:46.399 --> 00:06:48.399
Notice that as I'm doing this, notice
186
00:06:48.399 --> 00:06:50.720
that my left wrist is flat and
187
00:06:50.720 --> 00:06:53.339
perpendicular to the ground. This would
188
00:06:53.339 --> 00:06:54.740
be parallel. This is perpendicular.
189
00:06:55.319 --> 00:06:58.579
As I fold my right arm, notice that my
190
00:06:58.579 --> 00:07:00.680
left wrist is now on an inclined plane.
191
00:07:00.680 --> 00:07:01.379
It's at an angle.
192
00:07:02.139 --> 00:07:04.319
This is because I'm allowing my left arm
193
00:07:04.319 --> 00:07:08.759
to rotate slightly as I go back. This
194
00:07:08.759 --> 00:07:10.339
will set the club on plane. If I didn't
195
00:07:10.339 --> 00:07:11.560
do this, the club should have to be too
196
00:07:11.560 --> 00:07:11.920
steep.
197
00:07:12.980 --> 00:07:17.379
So elevation, flexion, and now my hand
198
00:07:17.379 --> 00:07:19.959
would be on plane as I let that rotate.
199
00:07:20.339 --> 00:07:21.980
Notice that my right elbow is still in
200
00:07:21.980 --> 00:07:25.720
front of my shoulder and the left elbow
201
00:07:25.720 --> 00:07:26.980
is above the right elbow.
202
00:07:28.339 --> 00:07:30.040
The other critical piece here is to
203
00:07:30.040 --> 00:07:31.699
notice what I call the right elbow pit.
204
00:07:32.220 --> 00:07:35.560
My elbow pits at address and neutral
205
00:07:35.560 --> 00:07:37.360
joint alignment would face straight away
206
00:07:37.360 --> 00:07:37.779
from me.
207
00:07:38.379 --> 00:07:40.660
Not in like this. That's not good
208
00:07:40.660 --> 00:07:42.639
posture. That's not normal. Everybody's
209
00:07:42.639 --> 00:07:44.139
elbows face out this way if we took all
210
00:07:44.139 --> 00:07:44.899
the muscles off you.
211
00:07:45.420 --> 00:07:48.620
So as I elevate, my arms come across to
212
00:07:48.620 --> 00:07:50.639
the center. There's a little bit of
213
00:07:50.639 --> 00:07:52.399
internal rotation, but we want to try and
214
00:07:52.399 --> 00:07:55.040
keep this right elbow pit always facing
215
00:07:55.040 --> 00:07:56.720
out away from us. That's going to be very
216
00:07:56.720 --> 00:07:57.980
critical when we get into the rest of the
217
00:07:57.980 --> 00:07:58.379
backswing.
218
00:07:59.179 --> 00:08:01.480
So elevation, grab the left thumb,
219
00:08:02.220 --> 00:08:04.839
flexion, and we've got a great backswing.
220
00:08:05.560 --> 00:08:06.980
Now as I mentioned, there's going to be a
221
00:08:06.980 --> 00:08:08.839
little bit of rotation here. We're not
222
00:08:08.839 --> 00:08:10.019
going to worry about this so much for
223
00:08:10.019 --> 00:08:13.360
now. Just here, get that elbow and
224
00:08:13.360 --> 00:08:15.040
shoulder in alignment.
225
00:08:15.600 --> 00:08:17.560
From down the line, we've got elevation,
226
00:08:17.879 --> 00:08:18.939
flexion.
227
00:08:19.459 --> 00:08:21.300
Notice that there's not a great deal of
228
00:08:21.300 --> 00:08:22.839
bend in my right arm. I want to feel like
229
00:08:22.839 --> 00:08:24.899
I have a lot of wit and my hands are out
230
00:08:24.899 --> 00:08:26.139
away from me. I'm not trying to rip my
231
00:08:26.139 --> 00:08:28.259
thumb back into my shoulder. It's here,
232
00:08:28.420 --> 00:08:29.399
and that's it.
233
00:08:30.379 --> 00:08:31.980
That's the basic movement of the arms,
234
00:08:32.000 --> 00:08:34.039
okay? So now what we're going to do, once
235
00:08:34.039 --> 00:08:35.440
you can do that correctly, and watch
236
00:08:35.440 --> 00:08:36.720
yourself in a mirror that you look just
237
00:08:36.720 --> 00:08:37.539
like I did there,
238
00:08:38.279 --> 00:08:39.279
now what we're going to do is we're going
239
00:08:39.279 --> 00:08:40.559
to stack another piece on there.
240
00:08:41.100 --> 00:08:42.299
So what we're going to do is we're going
241
00:08:42.299 --> 00:08:46.039
to do rotation with our elevation and
242
00:08:46.039 --> 00:08:46.480
flexion.
243
00:08:48.620 --> 00:08:48.960
Now,
244
00:08:53.139 --> 00:08:54.440
because you should have already mastered
245
00:08:54.440 --> 00:08:55.899
your setup by now, you should know how to
246
00:08:55.899 --> 00:08:57.259
hinge from the hip and get into the right
247
00:08:57.259 --> 00:08:59.220
position. And you should have already
248
00:08:59.220 --> 00:09:01.419
done five minutes to perfect rotation, so
249
00:09:01.419 --> 00:09:03.679
I shouldn't have to tell you how to
250
00:09:03.679 --> 00:09:04.539
rotate at this point.
251
00:09:05.840 --> 00:09:06.799
Rotate to the top,
252
00:09:07.500 --> 00:09:10.240
and now I'm in the right position. Stand
253
00:09:10.240 --> 00:09:10.759
up again,
254
00:09:11.340 --> 00:09:13.519
elevation, flexion,
255
00:09:14.240 --> 00:09:15.340
posture,
256
00:09:16.659 --> 00:09:17.340
rotation.
257
00:09:18.080 --> 00:09:20.320
That's it. This is how you check your
258
00:09:20.320 --> 00:09:21.120
backswing every time.
259
00:09:22.539 --> 00:09:26.080
Stand straight up, elevation, flexion,
260
00:09:26.799 --> 00:09:28.179
get into your posture,
261
00:09:29.080 --> 00:09:29.720
rotation.
262
00:09:40.639 --> 00:09:43.659
Notice that my elbow is still in front of
263
00:09:43.659 --> 00:09:46.240
my shoulder. I didn't do anything with my
264
00:09:46.240 --> 00:09:49.159
arms when I added rotation. I just
265
00:09:49.159 --> 00:09:51.779
transported them as a unit with my torso
266
00:09:51.779 --> 00:09:53.639
rotation. That's how your arms get moved
267
00:09:53.639 --> 00:09:54.879
into that depth dimension that I was
268
00:09:54.879 --> 00:09:55.519
talking about earlier.
269
00:09:56.279 --> 00:10:00.059
If you find that you do this and your arm
270
00:10:00.059 --> 00:10:00.740
looks like this,
271
00:10:01.800 --> 00:10:03.659
you've let this elbow drift away from
272
00:10:03.659 --> 00:10:03.919
you.
273
00:10:04.460 --> 00:10:06.179
And so what you need to imagine is that
274
00:10:06.179 --> 00:10:08.259
I've drilled a bolt into your arm. It
275
00:10:08.259 --> 00:10:10.620
allows it to move up and down, but it
276
00:10:10.620 --> 00:10:12.059
doesn't allow it to move this way. It
277
00:10:12.059 --> 00:10:13.220
doesn't allow it to move away from the
278
00:10:13.220 --> 00:10:14.879
body. It's only moving in that vertical
279
00:10:14.879 --> 00:10:17.240
dimension, not the depth dimension.
280
00:10:18.019 --> 00:10:21.379
If you find that you're here and your
281
00:10:21.379 --> 00:10:23.059
elbow just moves out a little bit, that's
282
00:10:23.059 --> 00:10:25.740
where that little bit of rotation of this
283
00:10:25.740 --> 00:10:27.019
part of your arm comes in.
284
00:10:28.440 --> 00:10:30.340
A lot of you will find that it's really
285
00:10:30.340 --> 00:10:32.559
normal for you to get here and your elbow
286
00:10:32.559 --> 00:10:35.679
pit wants to face back at you. As we get
287
00:10:35.679 --> 00:10:36.940
into the rest of the backswing, what
288
00:10:36.940 --> 00:10:40.139
we'll see is that as I'm going back, I
289
00:10:40.139 --> 00:10:41.720
want that to face away from me.
290
00:10:42.500 --> 00:10:44.159
And at this point, it should feel like
291
00:10:44.159 --> 00:10:45.720
it's facing the sky. It should never feel
292
00:10:45.720 --> 00:10:46.960
like it's rotated in.
293
00:10:47.519 --> 00:10:50.259
If it's facing the sky, my elbow can fold
294
00:10:50.259 --> 00:10:50.519
up.
295
00:10:51.200 --> 00:10:52.860
If it's facing this way, my elbow is
296
00:10:52.860 --> 00:10:54.580
going to fold in and move out away from
297
00:10:54.580 --> 00:10:56.600
me and get that flying right elbow. So
298
00:10:56.600 --> 00:10:58.059
it's important to keep that elbow pit
299
00:10:58.059 --> 00:10:58.820
facing away.
300
00:10:59.440 --> 00:11:00.919
And now we're in a great position at the
301
00:11:00.919 --> 00:11:03.480
top, okay? So that's the first piece. If
302
00:11:03.480 --> 00:11:05.220
you do this correctly, you take the time
303
00:11:05.220 --> 00:11:06.559
to go through these little steps that
304
00:11:06.559 --> 00:11:06.960
I've done,
305
00:11:08.240 --> 00:11:10.019
elevation, flexion, rotation,
306
00:11:10.700 --> 00:11:12.600
you'll know what it looks like and feels
307
00:11:12.600 --> 00:11:14.100
like to be in the perfect position at the
308
00:11:14.100 --> 00:11:16.600
top of the swing every single time. So
309
00:11:16.600 --> 00:11:17.600
now we're going to challenge you a little
310
00:11:17.600 --> 00:11:17.960
bit more.
311
00:11:18.960 --> 00:11:20.960
Now what I want you to do is go ahead and
312
00:11:20.960 --> 00:11:22.120
pick up a golf club, but I want you to
313
00:11:22.120 --> 00:11:24.360
flip it upside down. The reason for that
314
00:11:24.360 --> 00:11:27.059
is there's a tremendous amount of weight
315
00:11:27.059 --> 00:11:28.419
even though it doesn't seem like it. Once
316
00:11:28.419 --> 00:11:30.440
you start moving this around in space,
317
00:11:30.460 --> 00:11:33.059
there's a lot of inertia. As it builds
318
00:11:33.059 --> 00:11:34.360
momentum, it's going to want to act on
319
00:11:34.360 --> 00:11:35.759
your wrist joints and get you to move out
320
00:11:35.759 --> 00:11:36.259
of position.
321
00:11:36.879 --> 00:11:39.759
You're also attuned to what the club head
322
00:11:39.759 --> 00:11:41.279
feels like to you at the top of your
323
00:11:41.279 --> 00:11:43.220
swing, what you're used to. What you're
324
00:11:43.220 --> 00:11:45.259
used to probably isn't right, but you're
325
00:11:45.259 --> 00:11:46.580
going to want to settle back into those
326
00:11:46.580 --> 00:11:48.240
old movement patterns. We want to create
327
00:11:48.240 --> 00:11:50.340
new movement patterns, which means we
328
00:11:50.340 --> 00:11:51.759
need to break some old habits, and we
329
00:11:51.759 --> 00:11:54.080
need to start with baby steps, okay? So
330
00:11:54.080 --> 00:11:55.120
now we're going to make it a little bit
331
00:11:55.120 --> 00:11:55.820
more challenging.
332
00:11:56.720 --> 00:11:57.960
Hands are still in front of the center of
333
00:11:57.960 --> 00:11:58.539
my chest.
334
00:12:01.079 --> 00:12:03.419
Elevation, flexion, and let's see if we
335
00:12:03.419 --> 00:12:05.559
can keep everything else the same. If
336
00:12:05.559 --> 00:12:08.440
it's not, throw the club down and go back
337
00:12:08.440 --> 00:12:10.580
to doing it with just your arms until you
338
00:12:10.580 --> 00:12:12.519
can do that exactly right every time.
339
00:12:13.340 --> 00:12:16.639
Then we go elevation, flexion,
340
00:12:17.659 --> 00:12:18.620
posture,
341
00:12:19.519 --> 00:12:20.379
rotation.
342
00:12:21.080 --> 00:12:22.320
Same thing here.
343
00:12:23.179 --> 00:12:25.379
Elevation, flexion,
344
00:12:25.960 --> 00:12:26.940
posture,
345
00:12:27.820 --> 00:12:30.159
rotation. Perfect position at the top is
346
00:12:30.159 --> 00:12:31.080
all we've got to do to get there.
347
00:12:31.779 --> 00:12:34.240
Once you master that, this is going to
348
00:12:34.240 --> 00:12:35.820
take a while. You need to be patient with
349
00:12:35.820 --> 00:12:37.100
this because you're going to do it
350
00:12:37.100 --> 00:12:38.919
incorrectly. It's taken me lots and lots
351
00:12:38.919 --> 00:12:41.059
of reps to do it. The goal of these five
352
00:12:41.059 --> 00:12:42.580
-minute series is to get you to do these
353
00:12:42.580 --> 00:12:44.139
same movements over and over and over
354
00:12:44.139 --> 00:12:46.700
again at least five minutes a day. If you
355
00:12:46.700 --> 00:12:48.899
can put in 10, 15, 20, or 30, that's
356
00:12:48.899 --> 00:12:51.200
excellent. In five minutes, you should at
357
00:12:51.200 --> 00:12:53.059
least be able to start making progress on
358
00:12:53.059 --> 00:12:53.700
your golf swing.
359
00:12:54.720 --> 00:12:56.460
Once you start getting that comfortable
360
00:12:56.460 --> 00:12:59.139
where you have it with the shaft upside
361
00:12:59.139 --> 00:13:03.000
down, flip it into the normal position.
362
00:13:03.139 --> 00:13:04.120
This is where things get tricky.
363
00:13:04.879 --> 00:13:05.860
So now what we're going to do,
364
00:13:06.559 --> 00:13:08.200
same thing.
365
00:13:11.240 --> 00:13:12.460
I messed up there.
366
00:13:22.359 --> 00:13:24.720
Elevation, flexion, posture,
367
00:13:25.500 --> 00:13:27.820
rotation. Then we should see what it
368
00:13:27.820 --> 00:13:29.139
looks like and feels like to be at the
369
00:13:29.139 --> 00:13:30.860
top of the swing. Now you're going to
370
00:13:30.860 --> 00:13:32.039
notice that club is going to feel a
371
00:13:32.039 --> 00:13:32.620
little bit heavier.
372
00:13:33.220 --> 00:13:34.179
You're going to notice how it wants to
373
00:13:34.179 --> 00:13:35.419
move your hands and wrists out of
374
00:13:35.419 --> 00:13:37.379
position. It's very important that you
375
00:13:37.379 --> 00:13:39.259
take your time and move very, very
376
00:13:39.259 --> 00:13:39.720
slowly.
377
00:13:40.759 --> 00:13:42.639
Once you've done this enough, you're
378
00:13:42.639 --> 00:13:43.840
going to start out with just your arms.
379
00:13:43.960 --> 00:13:45.159
You may need to do that for the first
380
00:13:45.159 --> 00:13:46.799
week until you can get just your arms
381
00:13:46.799 --> 00:13:47.120
correct.
382
00:13:47.700 --> 00:13:49.519
Then add the distraction of a golf club
383
00:13:49.519 --> 00:13:50.399
turned upside down.
384
00:13:50.960 --> 00:13:52.519
Maybe that'll take you another week. For
385
00:13:52.519 --> 00:13:54.059
some of you, it might take five minutes.
386
00:13:54.960 --> 00:13:56.700
Once you can do it correctly, that's all
387
00:13:56.700 --> 00:13:57.200
that matters.
388
00:13:57.860 --> 00:13:59.480
Then you can flip the club back into its
389
00:13:59.480 --> 00:14:01.299
normal position and start working from
390
00:14:01.299 --> 00:14:01.559
there.
391
00:14:02.320 --> 00:14:04.179
Now, once we know what it feels like to
392
00:14:04.179 --> 00:14:06.360
be in the right position, here's what we
393
00:14:06.360 --> 00:14:09.679
want to try and do. We want to stack all
394
00:14:09.679 --> 00:14:12.200
of these things together and move to the
395
00:14:12.200 --> 00:14:14.259
top of the swing in one motion from a
396
00:14:14.259 --> 00:14:16.320
setup position. We're not quite ready
397
00:14:16.320 --> 00:14:18.379
yet, just yet. So what we're going to do
398
00:14:18.379 --> 00:14:20.220
now, we're going to start out in our
399
00:14:20.220 --> 00:14:24.259
posture and do our elevation and flexion
400
00:14:24.259 --> 00:14:25.159
and rotate.
401
00:14:25.940 --> 00:14:29.039
We want to do this enough until we get it
402
00:14:29.039 --> 00:14:32.620
right every time and can do it from our
403
00:14:32.620 --> 00:14:34.840
setup position. So that's the next little
404
00:14:34.840 --> 00:14:37.340
evolution here of our drills. The
405
00:14:37.340 --> 00:14:39.899
progression here is to start from setup.
406
00:14:41.379 --> 00:14:43.360
Now, once we've got the setup feeling, we
407
00:14:43.360 --> 00:14:44.779
know what it feels like to be at the top.
408
00:14:44.899 --> 00:14:46.559
We know what the arm movement feels. It
409
00:14:46.559 --> 00:14:48.039
just feels vertical. It doesn't feel like
410
00:14:48.039 --> 00:14:48.799
it's moving across.
411
00:14:50.040 --> 00:14:51.179
Now what we're going to do is try and
412
00:14:51.179 --> 00:14:51.960
glue it all together.
413
00:14:52.720 --> 00:14:53.279
Set up.
414
00:14:53.840 --> 00:14:54.820
Get in your posture.
415
00:14:55.580 --> 00:14:57.360
And all I want you to try and do, if your
416
00:14:57.360 --> 00:14:58.919
takeaway is already mastered, which it
417
00:14:58.919 --> 00:15:00.399
should be if you're watching this video,
418
00:15:01.700 --> 00:15:04.600
we're going to try and get from here to
419
00:15:04.600 --> 00:15:06.679
the top. And I don't want you to think so
420
00:15:06.679 --> 00:15:08.240
much about how to do it because your
421
00:15:08.240 --> 00:15:09.759
takeaway should be ingrained by now.
422
00:15:10.480 --> 00:15:12.440
What I want you to do is let your
423
00:15:12.440 --> 00:15:13.659
movement patterns happen, let your
424
00:15:13.659 --> 00:15:16.840
takeaway happen, and feel the same things
425
00:15:16.840 --> 00:15:17.419
at the top.
426
00:15:18.419 --> 00:15:19.659
So you know what it feels like. You
427
00:15:19.659 --> 00:15:21.019
should have done enough reps right now.
428
00:15:21.120 --> 00:15:23.299
By the time you move to this final stage
429
00:15:23.299 --> 00:15:25.279
of trying to do it correctly with the
430
00:15:25.279 --> 00:15:26.700
club in your setup position,
431
00:15:28.299 --> 00:15:29.879
flipped normal right side out,
432
00:15:30.480 --> 00:15:32.580
then it's going to be just getting to the
433
00:15:32.580 --> 00:15:33.799
top. And first,
434
00:15:34.340 --> 00:15:35.519
we're going to take another distraction
435
00:15:35.519 --> 00:15:36.379
out. We're going to take the weight of
436
00:15:36.379 --> 00:15:37.940
the club head out of there. I'm going to
437
00:15:37.940 --> 00:15:39.639
start in my setup position with just the
438
00:15:39.639 --> 00:15:41.500
shaft or just the butt into the club
439
00:15:41.500 --> 00:15:43.340
down. And I'm just going to try and get
440
00:15:43.340 --> 00:15:46.120
to that same setup position or top of the
441
00:15:46.120 --> 00:15:49.779
swing position by doing the same move. So
442
00:15:49.779 --> 00:15:53.580
I'm feeling this and this with a club in
443
00:15:53.580 --> 00:15:54.039
my hands.
444
00:15:56.360 --> 00:15:58.480
I'm just trying to get to the top. If you
445
00:15:58.480 --> 00:15:59.840
can't do it with a club in your hands,
446
00:15:59.980 --> 00:16:01.259
throw the club down,
447
00:16:01.820 --> 00:16:04.440
grab your left thumb, and create the same
448
00:16:04.440 --> 00:16:07.019
movement. But now we're doing it from our
449
00:16:07.019 --> 00:16:07.860
setup position.
450
00:16:09.180 --> 00:16:10.799
Until you can do that right, there's no
451
00:16:10.799 --> 00:16:11.639
point in having a club.
452
00:16:12.720 --> 00:16:14.419
Once you get it all together, then take
453
00:16:14.419 --> 00:16:15.840
the club, get in your normal setup,
454
00:16:16.179 --> 00:16:17.019
normal grip,
455
00:16:17.800 --> 00:16:21.080
and just try and move the same position
456
00:16:21.080 --> 00:16:22.080
at the top every time.
457
00:16:22.740 --> 00:16:24.419
Check yourself in a mirror. If you don't
458
00:16:24.419 --> 00:16:26.279
have a mirror or camera, you're going to
459
00:16:26.279 --> 00:16:27.820
have a hard time mastering these moves.
460
00:16:27.820 --> 00:16:29.519
You must be able to see exactly what
461
00:16:29.519 --> 00:16:32.279
you're doing. Once you can do this, you
462
00:16:32.279 --> 00:16:35.100
will have a perfect backswing every
463
00:16:35.100 --> 00:16:35.639
single time.
Testimonials

-Dr. Jeffrey Broker, Assoc. Prof. in Biomechanics at University of Colorado at Colorado Springs and Former Senior Biomechanist for U.S. Olympics Committee

-Hub Orr - Happy PREMIUM MEMBER of RotarySwing.com

-Sam Jarman, PGA Golf Instructor in the UK

Build the perfect golf swing following the most advanced online golf swing learning system!
JOIN OUR 454,114 MEMBERS AND GET INSTANT FREE ACCESS TO DOZENS OF VIDEOS!